

JPEG is one the most ingenious, sophisticated, complex and efficient image compression methods ever invented. It was invented by the Joint Photographic Experts Group (JPEG) and can be used to compress image files (JPEG files) as well as video files like MPEG-4 for example.
It's a lossy compression method (some data are lost during the compression), that can considerably reduce the size of the original data while keeping the main information visible to the human eye. JPEG takes advantage of how the human eye perceives digital images.
But what justifies the need for image compression methods at first? Let's explain some basics to understand why.
How does your computer display images?
A digital image displayed on a computer (or a device) screen can be seen as a rectangle subdivided into sub-rectangles of the same size, filled with a single color each. The sub-rectangles of the images are called pixels.
The number of pixels in a row is the width of the image. The number of pixels in a column is the height of the image.
So, for your computer to display an image on your screen, it must be given some series of bytes (data) that represent the colors of different pixels, that's a bitmap or pix-map.
Storing raw pixels of an image takes too much space
Since color is generally represented in RGB (or RGB) color mode, it takes one byte to store one pixel of an image. That means if we store individual pixels like that, the bigger the image is, the bigger the amount of space to store that image data in a file will be. For example, for a 5000x5000 image, the size would be 25000000 ~= 25 MB.
That's why computer scientists have invented image compression methods that allow us to encode the pixel data in a way that uses the least space possible and then decode the encoded values whenever we want to display the individual pixels on a screen for example.
JPEG is one of those methods. Let's see in detail how JPEG achieves this.
How does JPEG work?
A compression method is completely defined by how it achieves the encoding and the decoding of data.
JPEG encoding (or compression)
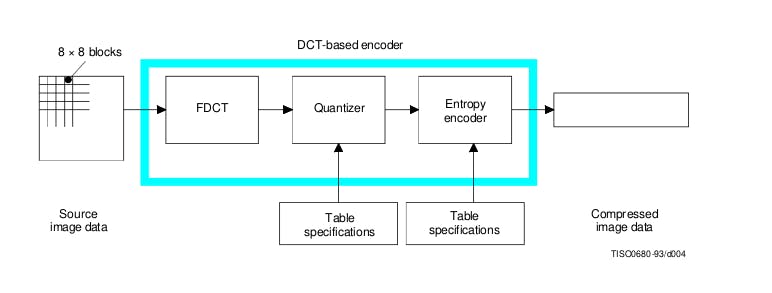
JPEG compression illustration. Source IUT.
Step 1: Color transformation
Human eyes are more sensitive to brightness than they are to color. This means that we can use less space to store the color information than the brightness of an image.
For that, JPEG transforms pixel colors into a format that expresses the brightness (luminance) and the color information (chrominance): YCbCr, where Y encodes the brightness, Cb (Chrominance blue) encodes the amount of blue and Cr (Chrominance Red) the amount of red. This gives us three components or channels for each pixel.
Then it drops some information in the Cb and Cr components by using the chroma sub-sampling method which generally operates on a sample of two consecutive rows of four (04) pixels each, and for each row, it reduces the number of colors to keep by either taking the mean of at max the four (04) colors (downsampling) or by taking just the left-most color.
This allows us to represent the sub-sampling scheme with three numbers as follows : J:A:B where :
J is the number of pixels in a row of a sample (4 in our case);
A is the number of chrominance (Cb or Cr) to keep in the first row among the J one ;
and B is the number of chrominance (Cb or Cr) to keep in the second row among the J one.

Chroma sub-sampling. Source Wikipedia.
From this step, all the next steps will operate on the individual channels (Y, Cb or Cr) separately.
Step 2: Discrete Cosine transform and quantization
Using mathematical formulas, any set of discrete (finite number) values can be represented as signals of different amplitudes and frequencies, and then from those signals, we can get the original values. Also, experiences have shown that human eyes are less sensitive to higher-frequency signals.
JPEG uses these two properties by operating on uniformly sized samples (with the same number of pixel values).
Simply put, for each sample JPEG produces a corresponding signal, this allows us to observe the frequency of the data. Then it breaks down each signal into a sum of less complex signals (cosine signals) of different frequencies. After, it eliminates the higher-frequency signals.
Finally, JPEG encodes in place of each original pixel a number representing how much each signal contributes to the original data or how precisely can we get back the original pixel data using this signal. This process is called the Discrete Cosine Transform (DCT) which establishes a mathematical correspondence between a set of numbers and the coefficients that represent how much each signal contributes to this set of numbers. Those numbers are called DCT coefficients and are the final output JPEG stores in place of the pixel values.
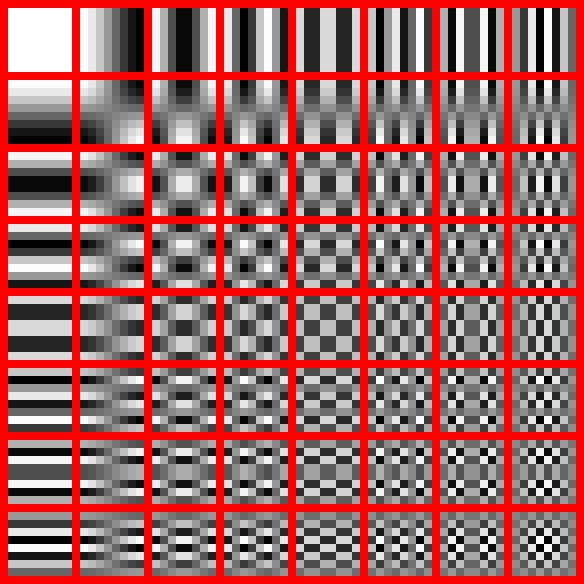
Discrete Cosine Transform on an 8x8 block showing how each coefficient contributes to generating the original pixels. Source Wikipedia
There exist multiple variants of the DCT formula that serve different needs. JPEG uses a DCT-II which is represented by :
$$\begin{align*} X_k &= \sum_{n=0}^{N-1} x_n \cos\left[\frac{\pi}{N}\left(n+\frac{1}{2}\right)k\right] \quad \text{for } k = 0, \ldots, N-1. \\ \text{where, } & k \text{ is the index of the datum or frequency,} \\ & X_k \text{ is the DCT coefficient at the frequency } k, \\ & N \text{ is the number of sample data,} \\ & x_n \text{ is the original data at index } n. \end{align*}$$
In practice, JPEG uses the following steps :
- Block splitting
We divide the image into n blocks of 8x8 pixels (the sample data) then we center all values (for the current YCbCr component) to 0 by subtracting half of the max value of the current color space rounded by excess. For example in the RGB color space color values are from [0, 255], by centering the values we get values in [-128, 127]. This makes it easier to convert the value into signals.
- Two-dimensional DCT-II on each 8x8 blocks
After, we apply the DCT to each block. We obtain a set of 8x8 DTC coefficients, in which the higher frequencies are grouped at the end (index = frequency).
- We suppress higher-frequency DCT coefficients
This is done by dividing all the DCT coefficients at different frequencies by a corresponding number at that frequency so that the result of that division is closest or equal to zero in the higher frequencies and non-zero values in the lowest frequencies. This process is called quantization.
The numbers by which to divide each DCT coefficient are defined as a quantization table and must be included in the final file that will be saved to allow the recovery of the original DCT coefficient (nearly) by multiplication. For each component (YCbCr) there is a corresponding table.
Step 3: Entropy coding
Up to this step, JPEG has taken advantage of the human eye perception, to drop some information thus considerably reducing the original size of the image data.
In this step, JPEG uses the following lossless methods (no data are lost during the compression) successively to compress even further the encoded DCT coefficients :
Here JPEG exploits the fact that most of the higher frequencies encoded DCT coefficients will be 0 values and then we'll have some series of zeros values.
To maximize successive number of zero values or similar non-zero values, JPEG groups the quantized DCT coefficients by arranging or sequencing the DCT coefficients in a zig-zag manner :

Zig-Zag arrangement of pixels. Source Wikipedia.
Then we group consecutive similar values and insert length coding values (how much they appear).
Huffman coding is a variable-length encoding technique where shorter codes are assigned to more frequently occurring symbols (or values), and longer codes are assigned to less frequent symbols. This way, the most common symbols are represented using fewer bits, which helps in compression.
JPEG decoding (or decompression)
The decoding is the reverse process of the encoding. Once the encoding is defined, the decoding becomes fairly easy and obvious.
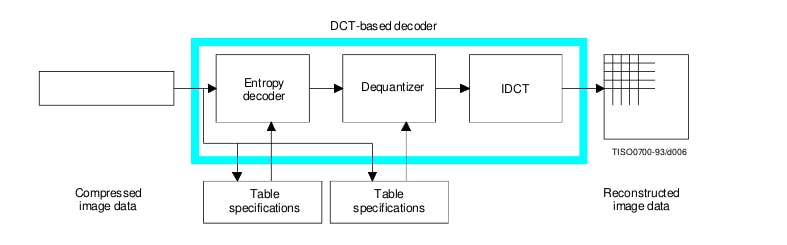
JPEG decoding illustration. Source Source IUT.
Step 1: Entropy decoder
The first step is to decode the result of the entropy encoding by first decoding the Huffman codes, and then applying the reverse RLE to the result.
The output of this step is the quantized DCT coefficients.
Step 2: Dequantizer
We then dequantize the DCT coefficients by multiplying each quantized coefficient by the same values found in the quantization table used in the encoding process.
Step 3: Inverse DCT
Finally, we can recover the initial pixels by applying the reverse of a DCT.
Conclusion :
JPEG is a clever technique for compressing image data, by aggressively dropping information less perceptible by the human eye, thus achieving remarkable compression ratios.
The article, where I shared my current understanding of JPEG compression, has covered the most important aspects of it. Additional information may be added while I continue to explore this topic.
Did you like the article or find something useful? Please don't forget to like or share your thoughts.
Suggestions are also welcomed as well.